HOW TO/ TIPS & HINTS
Do you ever think about how different foods came to be? Who discovered that we can eat potatoes? How did someone come up with the idea to grind wheat into flour and make bread with it? I’m always asking myself these questions and I also spend a lot of time wondering how foods are made too. Like tofu! How do you make tofu?
I always knew tofu was made from curdled soybeans, but how do you curdle soybeans? And how did someone decide that this was a thing that could be done?! There are a lot of tofu making kits for sale out there, but I decided to forego the kits and try to do it myself. A little bit of Googling turned up pages and pages of tofu making tutorials, but I decided to go with one on NPR’s Kitchen Window. Making my own tofu! It seemed doable! My tutorial is slightly adapted from that one, based on my own tofu making experience.
How to Make Your Own Tofu


Do you ever think about how different foods came to be? Who discovered that we can eat potatoes? How did someone come up with the idea to grind wheat into flour and make bread with it? I’m always asking myself these questions and I also spend a lot of time wondering how foods are made too. Like tofu! How do you make tofu?
I always knew tofu was made from curdled soybeans, but how do you curdle soybeans? And how did someone decide that this was a thing that could be done?! There are a lot of tofu making kits for sale out there, but I decided to forego the kits and try to do it myself. A little bit of Googling turned up pages and pages of tofu making tutorials, but I decided to go with one on NPR’s Kitchen Window. Making my own tofu! It seemed doable! My tutorial is slightly adapted from that one, based on my own tofu making experience.
 The tofu making process starts with dried soybeans—1 1/2 cups, to be exact. I bought mine in the bulk section at Whole Foods.
Whenever I use soy in a recipe, it’s inevitable that I get a comment or email complaining about it because “soy is GMO.” Well no, not all soy is GMO. The tofu I buy is GMO-free, and the soybeans I used in this recipe are organic and GMO-free too. So if you’re concerned about GMOs, please don’t think you can’t make or eat tofu!


After the soaking, you transfer the beans and soaking water to a food processor or high-powered blender (I used my Vitamix). Process the mixture until the beans are ground and the liquid is smooth.

Now you’ve got your soybean slurry all ready to go. Good! Bring 5 cups of water to a boil in a large pot or Dutch oven and stir in the soybean mixture. Reduce the heat to medium and stir constantly. When the mixture is simmering, almost coming to a boil, reduce the heat to low and continue to cook (and stir!) until a layer of foam forms—about 8 minutes.

Now you need to separate the ground up beans from the soymilk. The original tutorial calls for a cheesecloth here, but I found a nut milk bag to be much easier to work with. Put your nut milk bag in a large bowl and pour the contents of the Dutch oven into it. Carefully lift the bag out of the bowl and let the liquid strain out. I used a wooden spoon to press out as much liquid as I could. Discard the ground soybeans or save them for another use. (This soybean pulp is called okara and there are recipes out there that call for it! I’ll be honest, I discarded mine, mostly because I didn’t have time to make another recipe.)

Give your Dutch oven a quick rinse, then pour the soymilk back into it. Heat the soymilk over low heat, stirring frequently. While that’s heating, stir together 1 cup of water with 1/4 cup fresh lemon juice. This is your coagulant! It’s what makes the soymilk curdle. (Side note: See why I never take photos in my kitchen? It’s dark! And impossible to photograph in!)

Once the temperature of the soymilk is between 150°F and 155°F, remove it from the heat. I have a digital thermometer that decided to malfunction at this moment (thanks, digital thermometer!), so I had to guess. My tofu still worked out in the end, so if you don’t have a thermometer, don’t panic. I knew that if the soymilk was boiling, it would be way above 150°F. I figured that if it was simmering, it would also be too hot. So my soymilk was not quite simmering, but still too hot to touch.
At this point, add half of the coagulant to the Dutch oven and stir with a spatula 6 times, in a circular pattern. After 6 stirs, stop the spatula in its tracks, holding it upright in the pot until the soymilk stops moving. Pour in the rest of the coagulant and gently stir in a figure-eight pattern until small curds start to form. Cover the pot and let it sit for 15 minutes. After 15 minutes, it will look like this—there will be a layer of water on top, with curds on the bottom.

Curds! Rinse out your large bowl and nut milk bag because you’re going to use them again.

Put the bag in the bowl and then use a slotted spoon to transfer the curds from the Dutch oven to the bag. Once all the curds are in the bag, squeeze as much liquid out as you can.

At this point, I transferred the tofu to my handy tofu press. If you don’t have a tofu press, you can keep the tofu in the nut milk bag (or wrapped in a cheesecloth) and put a plate on top of it, then something heavy (like cans of soup) on top of the plate to press the liquid out. Press the tofu like this for 15 minutes. Drain out the excess water and refrigerate for an hour.

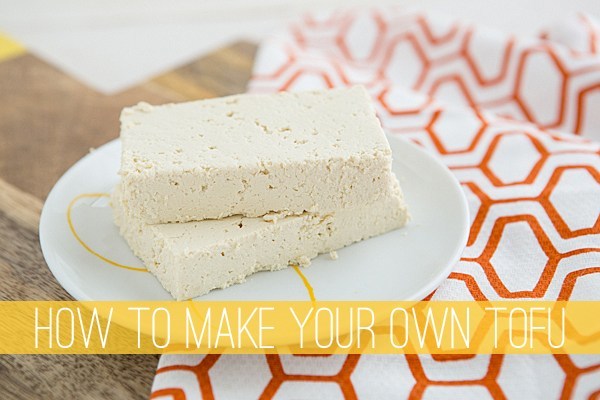
Tofu! Homemade tofu is more firm than silken tofu, but softer than the firm tofu I usually buy. It crumbles more easily, but I think the taste is better than the kind you buy at the store. That said, I’m not going to be making all my tofu from now on. This is one of those I-want-to-know-how-it’s-made-and-now-I-do projects, like when I made sandwich bread. You can use your homemade tofu right away or immerse it in cold water and store it in the refrigerator for up to 3 days.
Leave a reply